
You have a proposal to protect, a report to redact, or several PDFs to combine. What if you could describe the result you want and let your AI assistant handle the steps?
All-About-PDF's MCP connection makes that possible. Connect a supported AI client, choose which folders it can use, and ask it to work with your documents in plain language. All-About-PDF performs the PDF operations on your Windows computer and returns the processed files.
This guide explains what MCP does, how to connect All-About-PDF to the Windows desktop/Codex client, and how to use the PDF functions available today.
What is MCP?
MCP stands for Model Context Protocol. It is an open standard that lets AI applications connect to external tools and information. An MCP server describes the actions it can perform, the information each action needs, and the results it returns. The AI client uses those descriptions to choose an appropriate tool for your request. Learn more about MCP.
For example, you might ask:
Combine these two reports, remove blank pages, and return a compressed PDF.
The assistant can translate that request into the relevant operations. You do not have to write a script or remember a tool's internal name.
With All-About-PDF, the connection follows this path:
Your request → AI assistant → MCP server → All-About-PDF → processed file
The MCP server is a separate program. It passes commands to the Windows application through a named pipe, a local communication channel between the two programs.
Why is this useful?
MCP gives you a conversational way to use the PDF tools you already need:
- Less repetitive work. Describe a task instead of opening several tools and repeating the same selections.
- Several steps in one request. Ask the assistant to merge, clean up, compress, and protect a document in sequence.
- Specific instructions. Identify the files, replacement text, recipient restrictions, or output format you want.
- Files returned to the conversation. Successful actions return a file resource and a download link, with the display determined by the AI client.
The PDF operations run in All-About-PDF on your computer. That does not mean the entire conversation is offline: the AI service receives your instructions and tool results, and returned files may be made available to the client. DRM cloud validation can also contact All-About-PDF services when enabled.
Set up All-About-PDF
What you need
Use a Windows build of All-About-PDF that includes Connect an AI Agent, the accompanying MCP server files, and Node.js 22 or later. Your AI client must support local MCP connections. The application's normal licence and processing limits still apply; DRM requires an eligible edition or active trial.
The walkthrough below uses the Windows desktop/Codex MCP settings interface. ChatGPT in a browser has a different connection process, covered later in this post.
1. Open the connection wizard
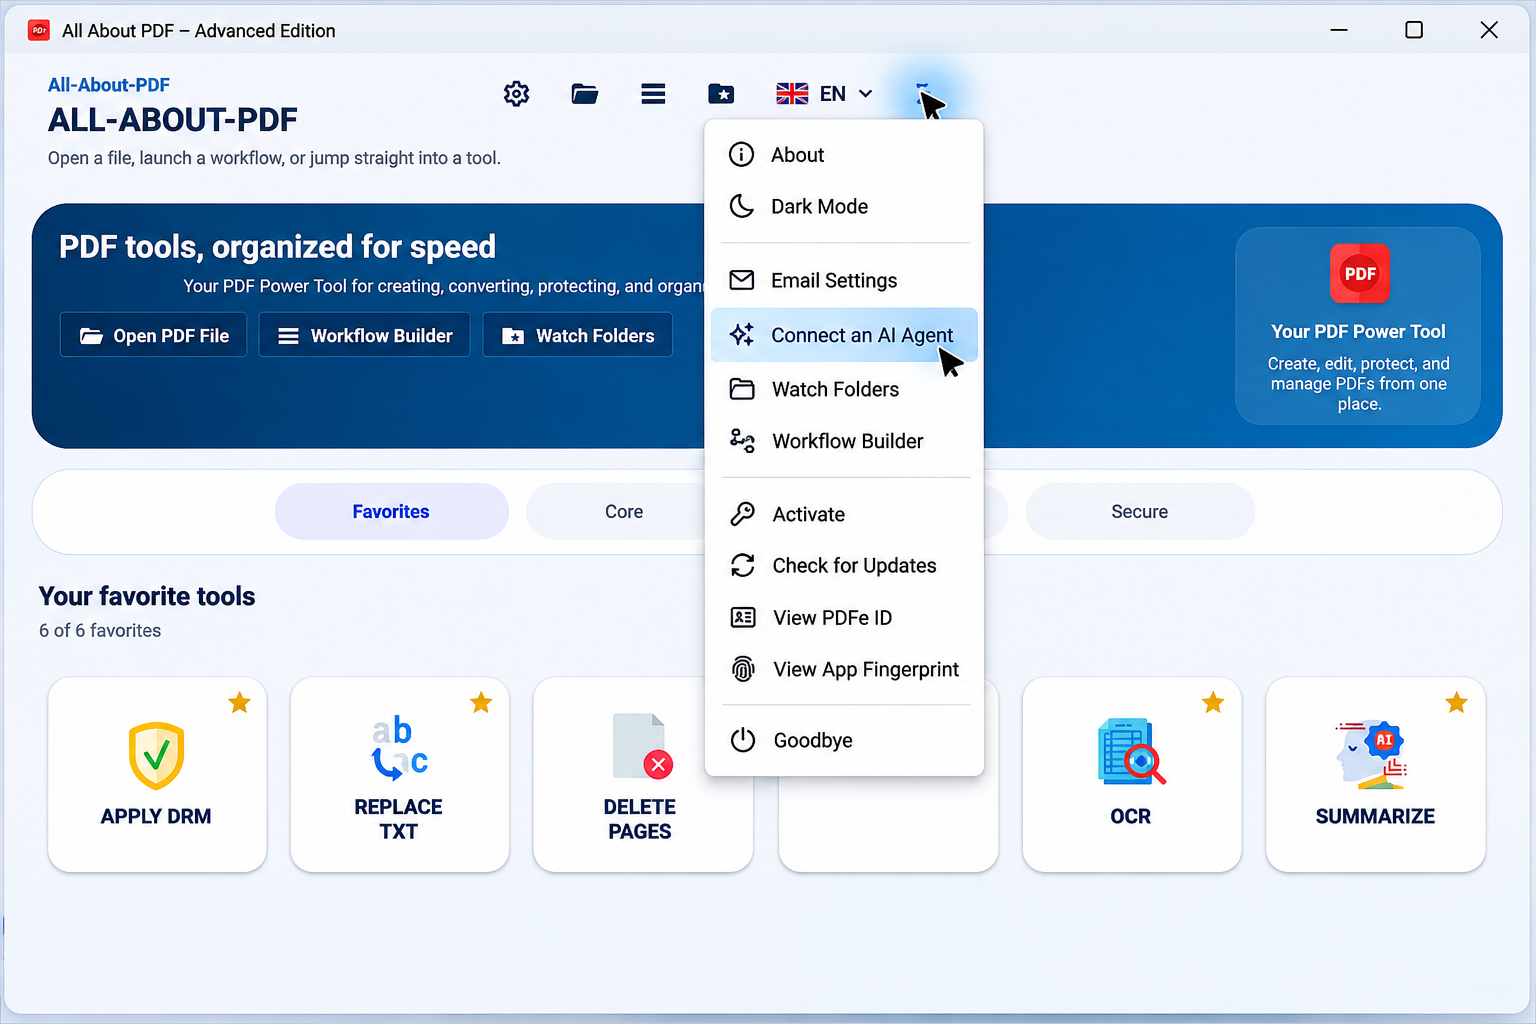
Open All-About-PDF, expand the three-dot menu, and select Connect an AI Agent.
2. Choose your connection
Select ChatGPT as the agent and Local (stdio) as the connection method.
Confirm the Node.js executable and the path to the MCP server's server.mjs file. The wizard fills in the bundled server path when it finds it. If Node is not available as node, use the full path to node.exe.
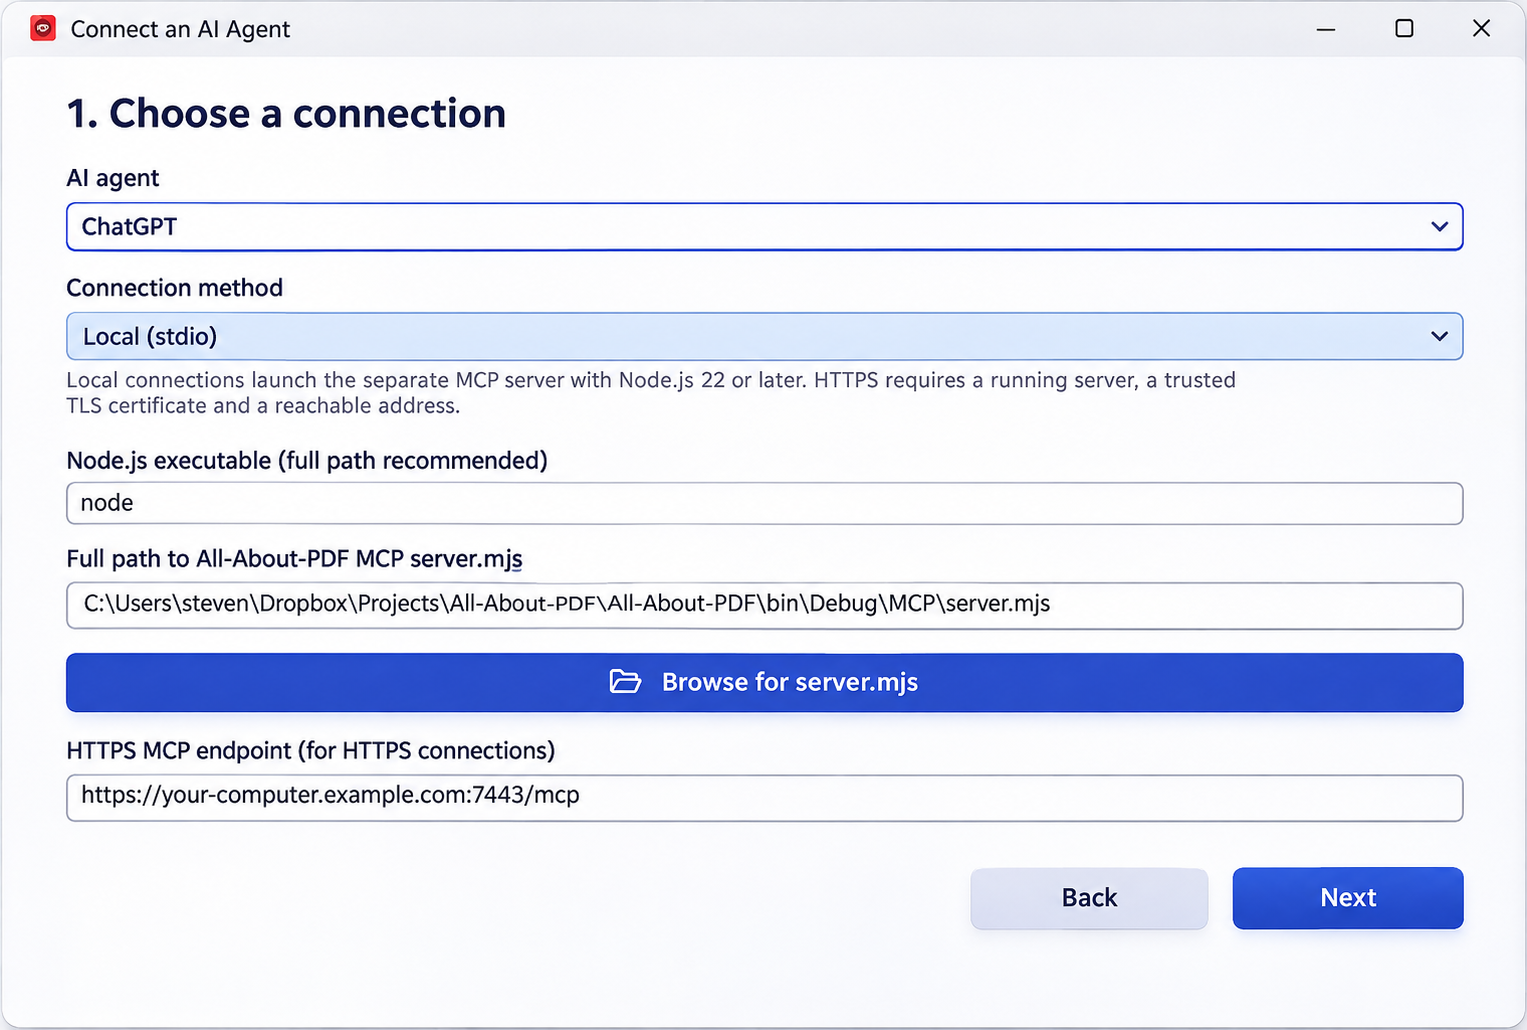
For a local connection, you can leave the HTTPS endpoint field alone.
3. Enable automation and choose your folders
Click Next, enable PDF automation, and select the permitted input and output folders.
For the examples in this post, imagine this workspace:
C:\PDF-Automation\
├── Input\
└── Output\
Create the folders first, or use existing folders of your choice. Select C:\PDF-Automation as the permitted input folder and C:\PDF-Automation\Output as the output folder. Including the workspace as an input folder lets a later action read a file created by an earlier action in Output.
Keep access limited to the folders you intend to use. These folder permissions apply to every agent connected to this application. Network paths and linked folders are not supported by the current automation interface.
4. Copy and test the connection details
Continue to Connect and test. The wizard provides the command, server argument, and environment variables to use in your AI client's MCP configuration.
Click Test application connection to check the local named-pipe connection. This verifies the application side; you will test the AI client connection separately next.
The wizard generates connection details. It does not install the connection into ChatGPT or Codex automatically.
Connect it in the Windows ChatGPT/Codex client
In the desktop interface that exposes local MCP settings, open Settings → MCP servers → Add server, choose STDIO, and enter the connection details. Save the entry and restart the connection. OpenAI documents the supported desktop configuration route in its MCP setup guide. Labels and availability can vary by client version and workspace.
Use the wizard's values to fill the form:
| Setting | What to enter |
|---|---|
| Name | A recognizable name such as All-About-PDF |
| Command to launch | node, or the full path to node.exe |
| Arguments | One argument containing the complete path to server.mjs |
Environment variable: AAP_PIPE_NAME |
The complete value generated by the wizard |
Environment variable: AAP_APP_PATH |
The complete path to All-About-PDF.exe generated by the wizard |
| Environment variable passthrough | Leave empty unless your environment needs it |
| Working directory | Can remain empty |
Enter paths as plain text in the settings form, using single backslashes. For example:
C:\Program Files\All-About-PDF\MCP\server.mjs
That is an illustrative installation path. Use the actual path from your wizard. Doubled backslashes are JSON escaping; do not paste them into a plain path field. You also do not paste the wizard's JSON into the chat composer.
If you manage Codex through config.toml, it uses TOML rather than the wizard's generic mcpServers JSON. Use the same command, argument, and environment values in the client's supported configuration format.
Test the connection
Start a new conversation if the current one has not picked up the server, then ask:
Use All-About-PDF to check whether the application is connected and PDF automation is enabled.
The assistant should use get_application_status. This check does not launch the application. If it is closed, ask:
Start All-About-PDF and check that its automation connection is ready.
The start_application tool opens the app and waits for its connection. Document operations can also start it automatically, but automation and folder access must already have been configured.
What about ChatGPT in a browser?
The local STDIO setup above is for a client running on your Windows computer. A cloud-hosted browser session cannot launch the local Node process using that configuration.
OpenAI's web setup uses Plugins → Add custom MCP server, with a server URL or a supported tunnel connection and an appropriate authentication method. Workspace permissions affect availability. See the official custom MCP server guide.
All-About-PDF's server includes HTTPS support for clients that accept a manually configured bearer token. The current integration does not implement OAuth sign-in or an automatic ChatGPT web connector. A browser deployment therefore needs additional connection and authentication setup; selecting HTTPS in the wizard alone does not complete it. The local Windows desktop/Codex route is the setup demonstrated here.
A theoretical browser setup
The following is a deployment design for a future browser connection, not a tested, ready-to-use All-About-PDF web setup. It explains the additional pieces an administrator or developer would need to configure.
There are two possible approaches: connect through a supported private MCP tunnel, or publish an authenticated HTTPS endpoint.
Option A: a private MCP tunnel
A supported tunnel could carry MCP requests to the Windows computer without making the All-About-PDF server publicly reachable:
ChatGPT in a browser
        ↓
OpenAI's authenticated tunnel service
        ↓ outbound connection from the Windows host
Local tunnel client → All-About-PDF MCP server → All-About-PDF
The proposed setup would be:
- Prepare the Windows host. Install the MCP-enabled All-About-PDF build and Node.js, enable automation, and select the permitted folders as described above.
- Create a tunnel. In OpenAI Platform's tunnel settings, create a tunnel and associate it with the ChatGPT workspace that will use it. The account needs the relevant Platform tunnel and ChatGPT workspace permissions.
- Configure the tunnel client. On a supported Windows runtime, configure a local STDIO profile that launches Node with All-About-PDF's
server.mjsas its argument. Supply the wizard'sAAP_PIPE_NAMEandAAP_APP_PATHvalues to that process. Run it under the same Windows user as All-About-PDF. Verify Windows support for the selected tunnel-client release before deployment. - Run and check the tunnel. Follow the official tunnel-client quickstart and diagnostic steps. Keep its credentials out of chat and source control. The host must remain awake and connected.
- Connect it in ChatGPT. Add a custom MCP server, select the Tunnel connection option, and select the associated tunnel. Complete the applicable authentication and workspace steps, then install the resulting plugin.
- Test the full route. Select the plugin in a conversation and ask it to check All-About-PDF's status. Then test one operation on a sample document and verify both the saved file and its delivery to chat.
OpenAI documents outbound tunnel connections and local STDIO forwarding in its Secure MCP Tunnel guide. The tunnel is a separate component; All-About-PDF's wizard does not create or configure it. This design would need validation with the actual client, account, and Windows runtime before being offered as a supported setup.
Option B: an HTTPS endpoint with an authentication gateway
A publicly reachable deployment could use an OAuth-capable gateway in front of the existing MCP server:
ChatGPT in a browser
        ↓ HTTPS + OAuth
Public authentication gateway: https://pdf.example.com/mcp
        ↓ private, authenticated connection
All-About-PDF MCP server on the Windows host
        ↓ local named pipe
All-About-PDF
The proposed steps would be:
- Prepare All-About-PDF locally. Enable automation, choose the permitted folders, and verify a local operation first.
- Run the MCP server in HTTPS mode. Configure the host's TLS certificate, private key, bearer token, public URL, and application connection. Keep the backend bound to a private interface. The existing MCP README describes these server settings.
- Add a public gateway and address. Give the gateway a stable HTTPS hostname and a trusted certificate. It must reach the server on the Windows computer; deploying a gateway in the cloud does not give it access to a named pipe on a user's PC.
- Implement the missing authentication bridge. The gateway would need ChatGPT-compatible OAuth discovery, sign-in, token validation, and authorization for the permitted tools. After checking the incoming request, it could authenticate to the private backend using its configured bearer token. The backend token must remain private; a static token alone does not implement OAuth.
- Align routing and access checks. Set the MCP server's public URL to the intended external endpoint. Preserve the expected Host header and configure only the required origins so legitimate requests pass the server's existing checks.
- Register the endpoint in ChatGPT. In the custom MCP server flow, enter a name such as All-About-PDF, supply
https://pdf.example.com/mcp, configure the compatible OAuth connection, and complete installation. Follow the current OpenAI custom MCP server instructions, since account permissions and interface labels can vary. - Test with a sample file. Confirm status, run a simple operation, and verify the processed-file download from the browser before using the connection for everyday work.
The gateway, OAuth integration, public hosting, and routing in this design are additional work. They are not installed or configured by the current All-About-PDF wizard.
File access and downloads need their own check
In either design, input paths still refer to the Windows host. A browser upload does not automatically become a file in that host's permitted input folder. The computer must be online, its permitted folders must be accessible, and its All-About-PDF licence must cover the requested operation.
For outputs, there are two distinct delivery paths:
- MCP file resources can travel back through the MCP connection, subject to client support and payload limits. Embedded reads are currently capped at 8 MiB; tunnel limits can impose a lower practical ceiling because binary data is base64-encoded.
- HTTPS download links need a browser-reachable
/files/...route. The current server issues a short-lived capability for one output file. A gateway must deliberately support that route and its authorization policy. A private localhost link will not become downloadable just because the MCP endpoint is tunneled.
A tunnel that forwards MCP messages should not be assumed to forward arbitrary file-download URLs. Large-file delivery therefore needs separate testing or an additional controlled download service. These checks are part of making the theoretical design a supported browser integration.
Use All-About-PDF in natural language
You can describe what you want without mentioning names such as compress_pdf. The assistant uses the available tool descriptions to select an action. If you have several PDF integrations connected, adding “use All-About-PDF” helps it choose the right one.
Give it the input files, the desired result, and a new output filename. All paths refer to the Windows computer running All-About-PDF. Replace the example paths below with your own.
Uploading a PDF to a chat does not automatically place it in All-About-PDF's permitted input folder. The current server processes files already accessible on that computer; input upload through MCP is not implemented.
Apply DRM protection
DRM is where All-About-PDF offers controls beyond a conventional opening password. The MCP tool supports expiry, recipient email restrictions, country and IP restrictions, device limits, printing limits, and forensic watermarking.
Use All-About-PDF to protect
C:\PDF-Automation\Input\proposal.pdfso only alex@example.com can open it. Make it expire 30 days after first opening, disable printing, and save it asC:\PDF-Automation\Output\proposal-protected.pdfe. Return the protected file here.
The output is a .pdfe protected document, which needs a compatible viewer. For expiry on a particular date, specify a time and timezone. Forensic watermarking requires an owner password. Cloud validation is available when requested and configured.
Add standard PDF password protection
Use password protection when you want an encrypted .pdf for compatible PDF readers.
Password-protect
C:\PDF-Automation\Input\report.pdfusing All-About-PDF. Require an opening password, use a different owner password, and disable printing and copying. Ask me for the passwords before processing. Save it asC:\PDF-Automation\Output\report-protected.pdfand return the file.
The tool uses AES-256 encryption. An opening password controls access to the document; an owner password controls PDF permissions. An owner-only PDF can open without an opening password. The permission options default to allowed, so state any restrictions you want. Enforcement of PDF permissions depends on the reader.
Redact sensitive text
Redact every occurrence of alex@example.com and “Account 12345” from
C:\PDF-Automation\Input\statement.pdf. Use All-About-PDF, save a new file asC:\PDF-Automation\Output\statement-redacted.pdf, and return it with the match count.
You can restrict the operation to pages, such as “pages 1 and 3–5,” or request a specific regular expression.
The tool applies black redactions to matched page text. It searches selectable text, not scanned images, and does not search metadata, attachments, comments, or form fields. It is not a full-document sanitization tool. Review the saved output before sharing it.
Find and replace text
In
C:\PDF-Automation\Input\contract.pdf, replace every occurrence of “Old Company Ltd” with “New Company Ltd” on pages 1–3. SaveC:\PDF-Automation\Output\contract-updated.pdfand return the updated PDF.
Find/replace searches selectable page text and can use regular expressions. Replacement text is literal. When you request several replacements, they run in the supplied order, so later searches can match text inserted earlier. The result reports the match count; zero matches produces an unchanged copy.
Convert a file
Convert
C:\PDF-Automation\Input\report.pdfto Word using All-About-PDF. SaveC:\PDF-Automation\Output\report.docxand return the converted file.
Available conversions are:
| Input | Output |
|---|---|
Word (.docx), Excel (.xlsx), PowerPoint (.pptx), text (.txt), or EPUB (.epub) |
|
HTML and its assets, returned together in a .zip |
|
A PNG or JPG image for each page, returned together in a .zip |
|
| PNG or JPG | PDF (.pdf) |
For example:
Export every page of
C:\PDF-Automation\Input\brochure.pdfas PNG images at 150 DPI. Return them inC:\PDF-Automation\Output\brochure-pages.zip.
Image export supports 72–300 DPI. Office-document-to-PDF conversion is not currently exposed through this connection. Conversion quality depends on the source PDF's layout and fonts.
Merge PDFs
Merge
C:\PDF-Automation\Input\cover.pdf,C:\PDF-Automation\Input\report.pdf, andC:\PDF-Automation\Input\appendix.pdfin that order. SaveC:\PDF-Automation\Output\complete-report.pdfand return it.
The merge tool preserves the requested file order, including repeated inputs. It accepts 2–100 PDFs and does not insert a table of contents.
Compress a PDF
Compress
C:\PDF-Automation\Input\presentation.pdfusing image quality 80. SaveC:\PDF-Automation\Output\presentation-compressed.pdf, return the file, and tell me the original and resulting sizes.
Compression optimizes resources and images. Image quality can range from 1 to 100; lower values may reduce visual quality. A PDF that is already optimized may not become smaller, which is why the result includes both sizes.
Delete blank pages
Remove blank pages from
C:\PDF-Automation\Input\scan.pdf. SaveC:\PDF-Automation\Output\scan-cleaned.pdf, return it, and tell me which original page numbers were removed.
The tool uses All-About-PDF's blank-page detection. If every page is detected as blank, it returns an error rather than creating an empty document. Review results when a document contains very faint content.
Combine actions into a workflow
Once the connection is configured, one request can describe several operations:
Use All-About-PDF to merge
C:\PDF-Automation\Input\report.pdfandC:\PDF-Automation\Input\appendix.pdfin that order. Save each intermediate file inC:\PDF-Automation\Outputwith a unique filename. Remove blank pages, compress the result at image quality 80, and return the final PDF. Report the final page count and size. Stop and report any error rather than retrying a submitted operation.
Each step creates a new output. Keeping intermediate files inside the permitted input workspace lets the next step read them. If you also want password or DRM protection, apply it last: the current document tools expect unencrypted PDF inputs.
Get your processed files back in chat
Every successful file-producing action returns its saved path and file-delivery information. Ask the assistant to return the processed file here or include the download link.
Depending on the client, the result may appear as an attachment, a preview, or a clickable link. Small outputs are also embedded as MCP file resources. Larger outputs remain available through their local path or an HTTPS download when that connection is configured.
For an output already created in the same running MCP server, the assistant can use get_processed_file with its returned file ID. It does not need to run the PDF operation again.
HTTPS download links expire after 15 minutes and authorize access to that one output file. Anyone with the link can download it during that period. Restarting the MCP server clears its file-delivery registry, but does not delete the saved files on your computer.
If something does not work
| What you see | What to check |
|---|---|
| The assistant cannot see the All-About-PDF tools | Enable or restart the MCP connection; try a new chat after updating it. |
| Node cannot launch the server | Check the Node executable and the exact server.mjs path. Use single backslashes in plain settings fields. |
| The application cannot be reached | Open All-About-PDF or ask the assistant to start it. Confirm automation is enabled. |
| Access denied | Check that the input and output paths are inside the permitted local folders. |
| Output already exists | Choose a new filename; the tools do not overwrite existing outputs. |
| No text matches | Check spelling, case, page ranges, and whether the document contains selectable text. |
| A request times out | Check whether the output was created before trying again. A submitted operation may still finish; do not automatically repeat it. |
You can also ask:
List the All-About-PDF functions available in this connection.
The connection currently exposes DRM protection, password protection, redaction, find/replace, conversion, merging, compression, blank-page deletion, application startup, connection status, and processed-file retrieval.
Start with a copy of a document and a simple request. Once the result looks right, combine the steps you repeat most often into a single prompt.